
When one of the boards in the middle of your laminate floor sustains damage, there are two ways to fix this issue. The first option is to disassemble the whole floor until you reach the broken panel, replace it and put the flooring back together. Unfortunately, this isn’t always the most practical method, especially in big rooms packed with furniture. The second thing you can do is to cut out the damaged floorboard and glue a new one in its place. This job does require some basic skills but it is far less complex than replacing a broken board on a hardwood floor, and you can do it without having to hire a professional carpenter. If you measure everything before you start and cut with a sure hand, you will end up with a very good result.
Read also: Measure the Room for Wood Floor Fitting Like a Pro
Tools and Materials for Replacing a Laminate Floorboard
You’ll need very few tools and materials to tackle this job.
This job requires just a few tools to complete, making it a feasible DIY carpentry project. But as we said before, it’s essential to check the list and see you have everything laid out ready before starting. Also, we recommend wearing goggles to protect your eyes from tiny plastic shreds when cutting your laminate flooring.
Check also: 5 Easy Furniture Repairs You Can Do By Yourself
- Straight edge ruler
- Pencil
- Circular saw
- Safety goggles
- Hammer
- Chisel
- Drill
- 1/2-inch drill bit
- Pliers
- Utility knife
- Cotton buds
- Carpenter’s glue
- Weights
Removing the Damaged Laminate Floor Panel
If you don’t want to dismantle the whole floor, you can apply this technique even if the bad board is near the walls.
- Draw a line down the centre of the broken board using a straight edge ruler and pencil. The line should cover the whole length of the board.
- Next, adjust the cutting depth of a circular saw blade to 1/8 inch more than the thickness of the panels. If your subfloor is concrete, however, set the cutting depth equal to the floorboard thickness.
- Put the blade onto the line near the centre of the panel and cut toward one end. Stop cutting when the knife reaches the edge of the board. Pull out the saw, reverse the direction and cut from the same central point to the other end. Insert the chisel into the split and lightly tap with the hammer to finish the cut on both ends.
- Drill a 1/2-inch hole on each corner of the board. The hole should be 1/2 inch from the two edges forming the corner. Draw lines at a 45-degree angle from each hole towards the cut line in the centre of the panel.
- Run the saw into the centre of the board and cut along each of the 45-degree lines. Stop at the drilled hole in the corners. This cutting procedure creates four triangular pieces that you can pull from the ends.
- Pick the pointed end of each triangle with a pry bar. Then pull the triangle to the centre of the board with pliers until it snaps loose. When you remove all four triangular pieces, pry out the two pieces left in the centre.
Read also: How to Hang a New Interior Door By Yourself
Installing a Replacement

It’s important to put something heavy onto the replacement board until the glue dries completely.
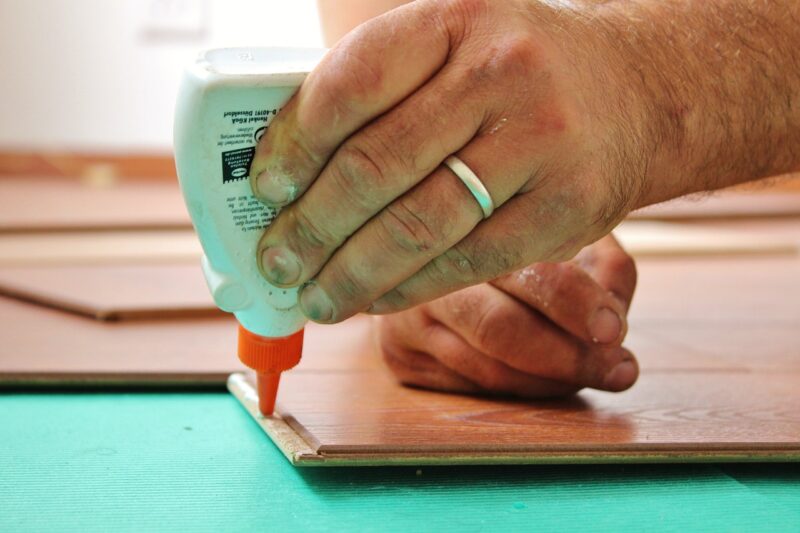
- Start preparing the replacement board. Cut the bottoms of the grooves on one side and one end using the utility knife. Score several times, then break off the pieces with pliers. Then, cut the tongue off the opposite end.
- Next, you’ll need to apply the carpenter’s glue on the tongues of the old boards surrounding the gap in the floor. Use cotton buds to spread the glue sparingly. That will prevent having the adhesive ooze out when you set in the replacement board. If some glue gets on the panels’ surface, wipe it off with a damp rag before it dries.
- Insert the intact tongue of the replacement board into the groove of the adjacent panel on the floor. Lower the replacement piece and press it down carefully on the edges. Use some weights to hold the board in place until the glue dries.
Check also: Fast and Easy Cracked Grout Repair at Home


